Wednesday, November 25, 2015

How to Alter a Tight Top and Make it Into a Shrug Jacket


I bought this over-sized, slouchy sweater from a seller I found on eBay because I thought it was super cute and looked comfortable and warm. I even ordered it a size larger than my normal size to make sure it would be loose.


What I got, was a very tight, tissue thin top, that no one could ever truly call a sweater.

So, I wrote in to tell the seller that their sizing is WAY off - I didn't bring up the tissue thin fabric, even though I should have.

The seller responded with a partial refund and an apology.

So, I decided to make the most of the otherwise useless garment by making it into a shrug jacket.


How to Make a Tight Top Into a Shrug Jacket

  1. Fold the top in half with the shoulder/neck seams lining up and the side seams lining up. (It will bunch up a bit at the shoulders.)

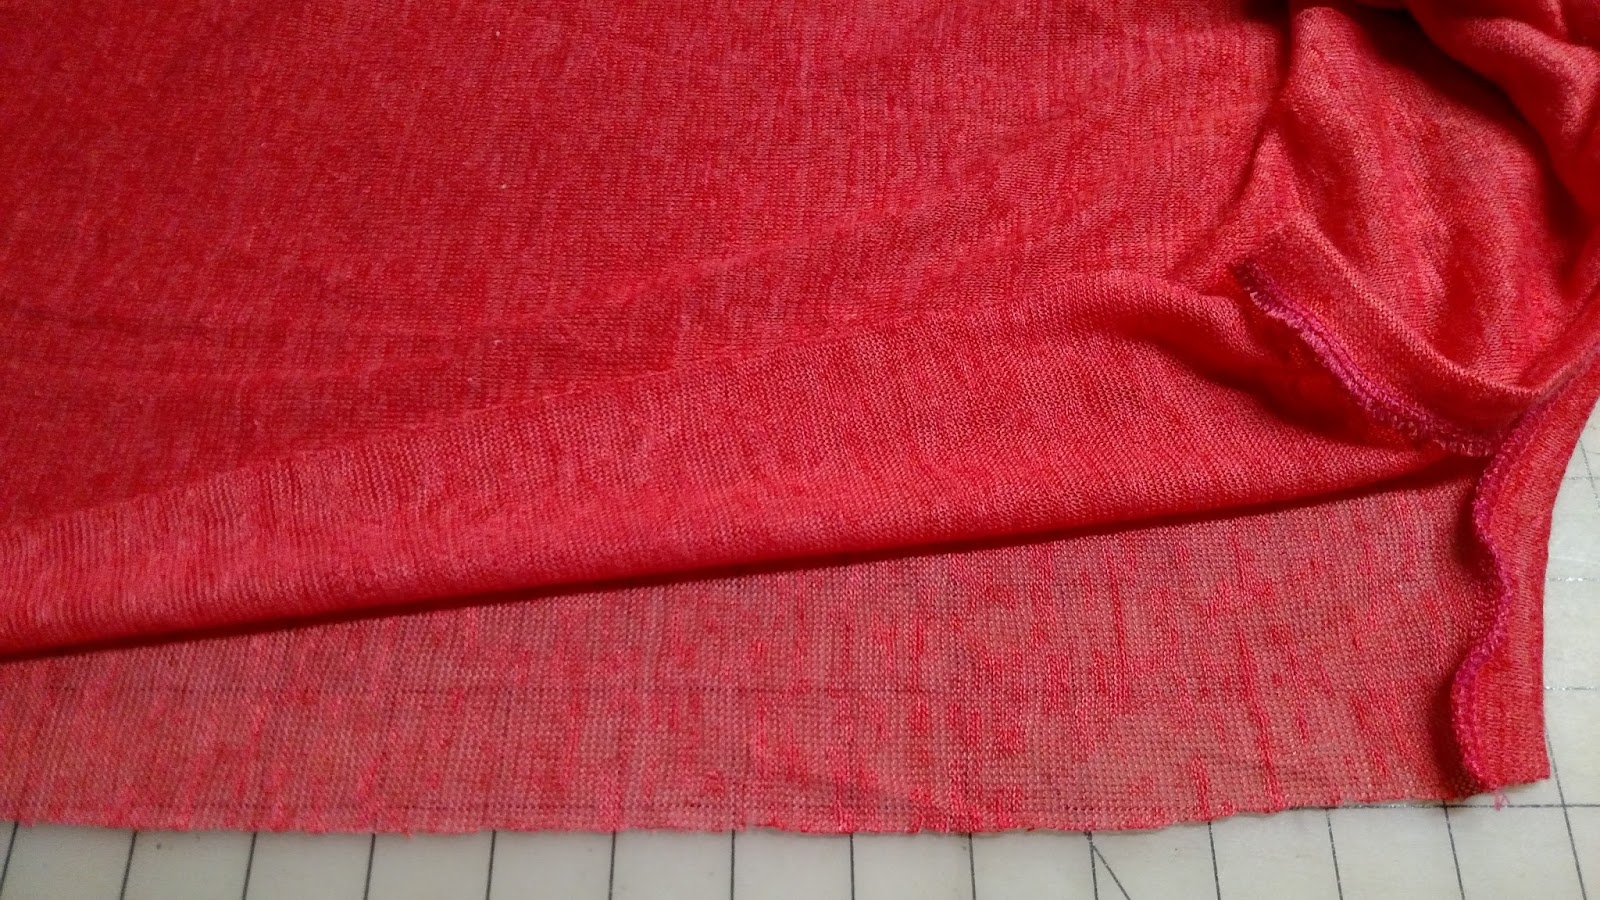
  2. Cut along the folded line on the center front of the top. (Sorry about the odd camera angle.)


  3. Fold the cut edge under 1/2-inch, then fold it under a second time and stitch close to the folded edge to create a simple hem.  (I used a zipper foot for this step so I could have abetter view of the fold and keep my stitching as straight as possible.)

  4. Stitch the length of the center line, and back tack to secure stitching, then trim off the loose thread ends. 
This is a super easy way to get some extra use out of tops that are too tight. I'll wear this over a white t-shirt and jeans or dress shirt with dress slacks or even a dark colored skirt.


(I'll try to remember to pop back in with a picture of how it looks when worn. Feel free to leave a reminder note if I don't.)


Thanks for checking out my tutorial on making a shrug jacket from a tight top. I would love to hear about your upcycling projects if you have time to leave a comment or share a photo.

Tuesday, November 24, 2015

Sewing Christmas Gifts: How to Sew Sheer Butterfly Scarves


Like many others, I've decided to sew some of my Christmas gifts this year. 
Sheer Butterfly Scarf
Still need to be ironed... 


So, when I was browsing at the fabric store and saw this incredible sparkly, sheer butterfly fabric, I thought of my mother's love for butterflies, and my own love for delicate shades of pink. 

(She doesn't follow my website or I wouldn't mention this yet.)

(<-- <-- <-- <-- <--<-- <-- <--You can see how sheer this fabric is, and the delicate butterfly, but I'm afraid its sparkliness doesn't really show - but it's there.)

First I thought, no... not for winter, but then I thought... not every scarf is for warmth - some can be just for prettiness. 

After all, who doesn't need something pretty now and then?


Getting the Sheer Fabric Cut


So, I took the bolt of fabric to the cutting table, and the woman cutting it asked how much I wanted. 

I told her I wanted one-yard. 

She asked what I was making.

I said a scarf. 

She asked what kind of scarf.

I told her, just a normal scarf that hangs down. 

She must have assumed I have never sewn, or maybe that I would have no other use for the extra fabric, because she went into a very long, detailed explanation of how to make a scarf, and that because the fabric was 60-inches wide, I would need no more than 1/3-yard for a scarf. 

Then she asked again how much I wanted.

I told her I wanted one-yard.

I wasn't being a smart-alec, or ignoring her - I just had other ideas for the excess fabric. 

After giving me a very disgusted look, and letting out a frustrated sigh to let me know I had offended her, she grudgingly cut the yard of fabric. 


How to Make Sheer Butterfly Scarves


Finished Sheer Scarf
I was a little nervous about sewing this sheer fabric, I have sewn many heavy and lightweight fabrics, but sheer was fairly new to me.

So, here are the steps I followed, and they worked so beautifully, I wanted to share. 

  1. Cut the strip of fabric, 12-inches wide and 60-inches long. 
    1. (One yard will make three scarves as long as the fabric is 58 or 60-inches long.)
  2. Fold in one corner about 1/4-inch, on the diagonal, then fold it over again. 
    1. (You could use silk pins, but I just held it with my fingertips to avoid the risk of damaging the sheer fabric.)
  3. Fold one edge over 1/4-inch, then fold it again, so it folds over the corner fold, kind of anchoring it. 
    1. (Again, you could use silk pins to secure this double-fold, but I just held it with my fingertips and it worked fine.)
  4. Test your machine's settings on a  tiny scrap of sheer fabric to make sure the tension is set right for sewing delicate fabric. 
    1. (As a rule, delicate fabric requires heavy presser foot tension to keep it from sliding.)
  5. Sew very close to the inner fold-line, hemming as close as you can get without missing the folded edge. 
    1. (The folded edge will almost resemble a small, sheer tube, but it will flatten as you sew.)
  6. When you get a few inches from the next corner, stop sewing, with the needle down so the scarf stays put, and repeat the corner double-fold, and create the double fold for the next side of the scarf. 
  7. Sew all the way to the edge of the fabric, then back tack two or three stitches.
  8. With the needle down. turn the scarf 1/4 turn, and back tack the next side's corner, then keep folding and sewing.
  9. Repeat the corner folding and side hem folding until you have stitched all the way around the scarf. 
  10. Clip off stray thread-ends, then iron the hemmed edges. 
  11. (If you forgot to check the fabric's care label on the bolt when you bought the fabric, err on the side of caution - always.) 
  12. Set the iron on the cool-to-lukewarm setting and use a damp pressing cloth to protect the delicate sheer fabric. 
  13. Or,  test the warm iron on a scrap of the fabric, if you have any, to make sure it doesn't melt the fabric.

Final Sheer Fabric Sewing Tip: 


If you prefer hand-sewing, you will probably have to pin the folded edges before sewing because your hands and fingertips will be busy stitching, and unavailable to fold and turn corners as you work. 


Total Pageviews