Wednesday, May 9, 2018

Tips for Setting Up a Sewing Room to Increase Your Creativity

Whether you're moving to a new house or creating a new creative space in your existing home, setting up a sewing room that fits your crafty needs is a great way to boost your creativity.

Setting Up a Sewing Room to Increase Your Creativity
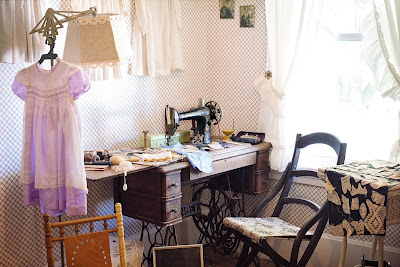
Setting Up a Sewing Room to Increase Your Creativity image courtesy of Pixabay


How to Set Up a Sewing Room


The size of the room you're working with has a lot of impact on the way you can set it up. However, even tiny rooms (like the adorable sewing nook shown above) can be set up to boost your creativity and to make it easier to find things quickly.

Think About Your Basic Sewing Needs First


You need a place to cut out material, a place to put your sewing machine, and enough room for at least a small ironing board for pressing seams and smoothing out fabric wrinkles. These things can all be space-grabbers, so it's good to make room for them before filling up your available floor space with other things. Another good thing to add to a room that's a bit a larger is a cabinet with doors to store your fabric and materials. The doors help keep dust from settling on your sewing supplies.

Organizing a Sewing Room

Some things to consider including in your sewing room as space allows:
  • Filing cabinet: for storing patterns and notebooks with notes about your projects
  • Dressmaker's dummy: to display garments during the fitting phase and to experiment with when draping fabric
  • Open shelving unit: great for stacking smaller boxes of patterns and sewing notions
  • Extra directional lighting: to enhance visibility and reduce shadows when you want to sew after dark
  • Under-table storage: take advantage of the unused space under your cutting table to store plastic tote bins or cardboard boxes of sewing supplies. 
  • Wall shelves and hooks: also let you make great use of otherwise wasted space in your sewing room. 

Start With an Empty Space


You'll find that starting with an empty room and setting it up around your needs is easier than rearranging a room that's already packed full. If you're setting up your sewing room in the house where you currently live, it may be easiest to remove everything from the room long enough to set it up for your needs. 

If you're wanting to find some new digs to move into and set up your sewing room, check out these houses for sale: Indianapolis to get some ideas of what's available in that area, and picture yourself filling your sewing room (in a new home) with the things you need to create beautiful garments, quilts or embroidered items.

Stitching it Right is honored to partner with REDFIN to bring you this post!

Tuesday, May 8, 2018

How to Disassemble a Motorcycle Seat for Reupholstery

Motorcycle seats take a lot of abuse from the sun and elements, and when you need to reupholster one, if you're a do-it-yourself enthusiast, the first step is to disassemble the motorcycle seat for reupholstery.

How to Disassemble a Motorcycle Seat for Reupholstery image courtesy of Pixabay

Steps to Disassemble a Motorcycle Seat for Reupholstery

To get started, after removing the seat from your motorcycle, flip it upside down on table.

This lets you see how the old upholstery is attached.

  • Look for staples holding the cover to the seat pan if the pan is plastic or plasti-fiber.
  • If the pan is metal, look for sharp small triangles holding the cover to the pan.
  • Another way covers have been known to be attached are by hard plastic J-strips that are heat-molded to the vinyl cover.

Disassembling a Stapled Motorcycle Seat Cover


If your hands are sensitive, put on some work gloves and pick up a staple puller.

Drive the tip of the staple puller under the staple and lift while twisting the staple puller.

Remove all of the staples, then peel the old cover off as gently as possible - anything you can keep intact can be used as a pattern - and having a pattern makes the next steps easier.

Disassembling a Motorcycle Seat Cover Attached With Triangle Prongs

Use a staple puller or screwdriver to gently push under the tip of the triangle prong.

Still being gentle, lift up on the point - these are often rusty and break easily if you manhandle them - so if you want them to hold up - go easy.

Gently peel the cover off after the fabric has been released from all the triangles.

Disassembling a Motorcycle Seat Cover Attached With a J-Hook Clip Edge


This one takes a bit of extra hand strength...

You have to press into the foam to let the tension off of the J-hook clip edge - then, it sort of pops because it's snapped on tight if it isn't broken.

Another way is to cut about an inch above the strip of J-hook clip, then peel the top off the foam padding and slide the clip off the pan. (This method can make a headache when you're ready to reassemble the new cover, but there'll be more details about that in following posts.)

Now that you're motorcycle seat is apart, you're ready to move on into the reupholstery steps of patterning, cutting, stitching and stretching the new cover onto the pan. (Oh, and of the foam's bad, that may need replaced, and I'll be back with a tutorial on that, too.

In the meantime, I would like to invite you to check out another great sewing site!

Stitching it Right is honored to partner with Teach You to Sew to bring you this post!


You can find more great sewing tips and product reviews from our friends at Teach You To Sew!


Total Pageviews