 |
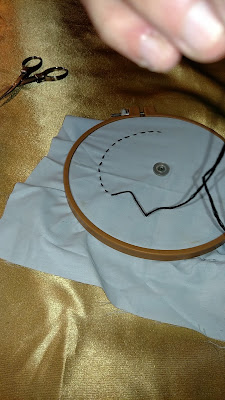
| Example of Straight Stitch in Hand Embroidery |
Uses for the Hand Embroidery Straight Stitch
In the embroidery tutorial video shared here, I used the straight stitch to create a border for a quilt square.
This stitch is also called the running stitch, and it is the same hand sewing stitch used for hand-basting in garment-making.
You can use this stitch with regular thread instead of embroidery floss to quickly mend ripped seams in garments, too.
The square shown in the video has a button I attached in an earlier episode of Sewing Lesson From Stitching it Right. The button is going to be the center of a flower, and if you like the way this freehand embroidered flower looks when I get to the final episide, how to make it yourself will be shown in videos, and you can follow them through one by one.
Each video is short, so you can do it a step at a time, and you, of course, have the choice to do a step a day or do the entire project in one session if you're excited to get started.
Here's the video, and the written directions are below:
What You Need to Do the Straight Stitch
 |
| Embroidery Floss in Storage Case |
- This reduces the chance of it tangling while you're working. Embroidery floss is crafted from three strands of fiber twisted together.
- When you want a heavy effect, like I did for the border shown in the video, use a fairly large needle and expect it to pull fairly hard as you tug the floss through the fabric.
- (You can actually hear it pop a few times in the video because I had to pull so hard.)
- For most embroidery, you'll want to split the floss into either two or three strand sections because it still gives off a kind of luxe effect but it's easier to work with and does less damage to the fabric, and I'll put up a quick video to show you how to do that.
Embroidery needle: You may be able to get by with 'just any hand sewing needle" - there is, however, a difference in embroidery needles tha tmakes them ideally suited to hand embroidery and worth the effort to seek out when shopping for hand embroidery supplies.
- Embroidery needles are designed with longer, narrower eyes than regular hand sewing needles.
- The narrow design makes it easier to pull the needle through tightly woven fabric.
- The long, narrow eyes in embroidery needles make it easier to feed the embroidery floss through when you're threading them.
Embroidery hoop: It's possible to work without an embroidery hoop, but using one reduces the soreness and stiffness you expereince in your fingers and hands.
- When the fabric is properly secured in an embroidery hoop, it's easier to see what you're doing.
- It also gives you more control over the fabric and needle so you can make sure you stitches land right where you want them.
Fabric: Not trying to be facetious here, but you have to have something to embellish or practice sewing on when you're learning to do the straight stitch.
- If it's your first time trying this stitch, you may want to grab a scrap of fabric or an old garment that's worn out so you can practice as long as you want.
- If you're ready to add your straight stitches to a project as an embellishment, make sure the fabric is smooth, ideally in an embroidery hoop, but you can do it by working slowly and carefully even if you don't have one.
Thimble: Thimbles are optional, but can save your fingers some soreness, especially if you're working on a tightly woven fabric and using all six fibers of the embroidery floss.
Steps for Making the Straight Stitch
Prepare the needle: Thread the needle and tie one end of the embroidery floss.
- Adjust the floss so the loose end is about four inches higher than the knot.
Start Embroidering: Poke the needle through from the back of the fabric and pull the thread through all the way.
- Move the tip of the needle between 1/8-inch and 1/4-inch, depending on the effect you're trying to create, and poke it down through the fabric.
- Repeat the steps over and over until you reach the end of the area you're embellishing.
Anchor the stitches: With the needle on the back side of the fabric, make two or three tiny stitches that are hidden under the previous stitches, then cut off the thread ends.
Thanks for visiting Stitching it Right, be sure to visit our YouTube Channel, Sewing Lessons From Stitching it Right or hop over to our Facebook page for quick answer to any sewing-related questions you may have.

No comments:
Post a Comment